BibGuru Blog
Be more productive in school
- Citation Styles

How to do a class presentation (11 steps)

The best class presentations combine strong content and visuals with an engaging presentation style. This post offers 11 steps for creating memorable and high-performing class presentations.
1. Review assignment guidelines
Before you can strategize about how to start a class presentation, you need to be certain that you understand the assignment details. Consult materials that your instructor provided, like rubrics, to determine what your presentation needs to cover and what form it should take.
For instance, are you presenting individually or as part of a group? How long should the presentation be? Are you required to have visuals? Knowing these details will help you to plan a successful class presentation.
2. Make a presentation plan
Once you've reviewed the specific assignment details, it's time to make a presentation plan. You can start by making an outline of your talking points. Outlines for class presentations will look similar to those for papers, with sections and subsections that work through your main ideas. You'll want to be precise about what points are essential to communicate to your audience. Also, take some time to decide on a completion timeline to ensure that you're ready on presentation day. Remember to build in time for practice!
3. Choose your visuals
At this point, you'll also want to determine what kind of visual aid(s) you want to use: a handout or a digital presentation, or both? Keep in mind the assignment requirements, but also the audience and the presentation format. For example, are you presenting to a large audience? If so, a handout might not be efficient. Are you presenting in-person or online? If you're preparing an online presentation, a PowerPoint or Google slides presentation will help your audience follow along.
4. Fill out your outline and keep it simple
Now that you've developed a plan for completing your class presentation, you can begin to build out the actual content. If you've created a basic outline, fill it in with some substance. Remember to keep it simple. At around 10-15 minutes, the average in-class presentation can only effectively communicate around three main points. Avoid long quotes or monologues. Your audience may find it difficult to follow longer textual components.
5. Design your visuals with minimal text
Along similar lines, don't simply plop your outline or textual notes into your visuals. Visual aids should be just that: aids that allow your audience to better visualize the main points of your presentation. Large blocks of text on a PowerPoint can be hard to see, so work on creating a digital aid that is mostly comprised on images. When text is appropriate, use bullet points and active words that your audience can remember.
6. Allow time for revisions
Once you've compiled your notes and created your visuals, take some time away from the project. You'll return to your work with fresh eyes. Then, allow time for revision: be sure to proofread your notes, slides, and/or handouts and make sure your visuals are clear. Check to see if any images that you're using appear pixelated on a larger screen and make sure your text is readable from a distance.
7. Check your citations
Many in class presentations will require citations, especially if they are accompanying a paper or another class research project. You can use BibGuru's citation generator to create your citations and copy them to your slides or handout. Consult your assignment guidelines, or ask your instructor, to find out what citation style is required.
8. Practice...and practice again
Give yourself time to practice your presentation in front of an audience before the big day. Familiarize them with the assignment guidelines, as needed, and ask them to time you. You'll need to know if your presentation meets the time requirements. After the first run though, consider these questions:
- Is your presentation too long or too short?
- Are you hitting the main points in a logical sequence that your audience can follow?
- Are your visuals clear?
- Is your delivery fluid or are you pausing too often to look at your notes?
- Are you making eye contact with your audience?
Use your answers to these questions to determine what, if at all, you need to change and then schedule another practice. You should practice your presentation as many times as you need to in order to achieve a fluid delivery.
9. Prepare for technical difficulties
Since most class presentations will include a digital element, be prepared to troubleshoot if there are technical difficulties on presentation day. Always have a back-up plan and be sure to save your visuals in multiple places. Keep a copy of your notes and slides in your email, on a thumb drive, and/or on the cloud. Practice enough so that, in the event that you can't get your visual aid to work, you can still deliver your presentation.
10. Take the stage with confidence
If you've followed your plan, practiced thoroughly, and prepared for possible technical difficulties, you should be ready to take the stage with confidence. Nervousness is absolutely natural, but try your best to relax and breathe. A few shoulder rolls and deep breaths right before the presentation can go a long way to making you feel more focused and centered.
11. Connect with your audience
From the first moment of your presentation, you'll want to establish a strong connection with your audience. Smile, make eye contact, and modulate your voice appropriately. Remember, people exhibit all kinds of facial expressions when they are listening or concentrating, so try not to pay too much attention to individual faces.
Also, although your instructor will be the one grading you, don't simply present to them. Include the entire class in your gaze. Finally, be careful about pace. If you have a tendency to speed up your speech when you're nervous, make a conscious effort to slow down.

The bottom line
Following the tips above will enable you to confidently deliver a class presentation to your instructor and classmates, or to any audience. With solid preparation and ample practice, your next class presentation will be a memorable success.
Frequently Asked Questions about class presentations
The most successful presentations begin with a hook. This could be a short, yet compelling story, an eye-catching visual with brief analysis, or an inspiring quote or statistic. No matter how you begin, ensure that you can fluidly transition to the main substance of your presentation in a way that your audience can easily follow.
Regardless of the subject of your presentation, you can make it interesting for your audience by engaging them through consistent eye contact, a relaxed and confident delivery style, and interactivity. For instance, to keep your audience engaged, you might try including questions or brief activities in your presentation.
Wrap up your presentation by summarizing your key points. You can also end with a provocative question or thought. You should also thank your audience for listening.
Good presentations are well-organized, time-sensitive, clear, and delivered with confidence.
The most common presentation mistakes include: not engaging your audience, using visuals that are overloaded with text, and not practicing enough.

Make your life easier with our productivity and writing resources.
For students and teachers.
The 10 Best Presentation Tools for Students in 2023

Presentation tools for students have come a long way.
Students have access to all sorts of digital presentation tools, from legacy slide-based tools like PowerPoint to truly inventive and experimental new formats that incorporate live and prerecorded video and audio. The rise in virtual, hybrid, and flipped classrooms has made the need for education-focused online presentation tools for students all the greater.
Wondering which tools will help your students create the best presentations? We’ve shown you tools before, like 20 classroom technology tools you may not know , but many of those were teacher-focused. Here are 10 of the best student presentation tools your kiddos can use in 2023. And listen to this episode of EdTech Heroes with Sultan Rana to see how you can revolutionize presentations for students this year!
Importance of students learning to use a range of presentation tech tools 🎬
Before we get into this list, it’s fair to ask: Is it really all that important for students to get comfortable using technology-based presentation tools? 🤔
We believe the answer is an emphatic “Yes!”
The modern world we live in already depends on all sorts of tech and that dependence will only increase. Today’s students are tomorrow’s adults, and it’s vital they develop media literacy skills now. This is behind the push for digital citizenship , or teaching children to use tech safely and responsibly so they can effectively participate in society in the future.
Many students are already comfortable navigating smartphone apps, video games, smart TVs, and social media. But throw a PowerPoint or other business tool in front of them, and it’s another story. They aren’t technology averse. But neither are they automatically comfortable with all the different software and user interfaces that they’ll encounter in the professional and business world.
As the world grows more technologically complex 🤖, the professionals of tomorrow need exposure today to the language of technology.
By engaging with a range of presentation tools — along with edtech tools like Google Classroom and other LMS platforms — students gain a more well-rounded understanding of how to interact with productivity-oriented tech. They learn how to communicate their ideas and collaborate across physical and virtual spaces with ease.
With that question answered, let’s jump into the top 10 student presentation tools that will support your students’ tech skills and overall growth.
1. Screencastify Submit
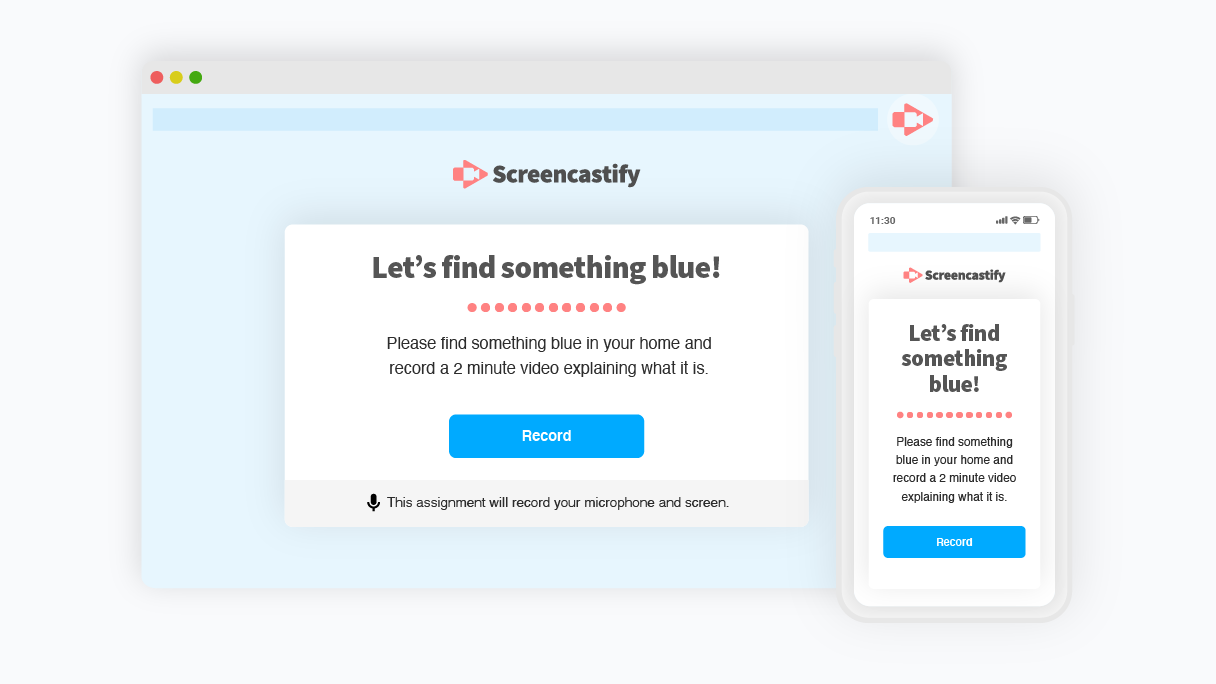
Screencastify Submit does many things. It allows teachers to create presentation assignments for students. It also allows students to easily record and submit these short video assignments on any device. It’s a great way to practice giving live presentations without the pressure of an audience, plus it helps students gain skills with talking and presenting on camera. 🎥
Another advantage for students: Students can practice their presentation skills and wait to submit until they’ve recorded their favorite take.
Screencastify Submit is simple because it’s designed to be a secure, closed system between teachers and students. However, the broader Screencastify suite — one of the top Google Chrome extensions for educators and students — has plenty of integrations with popular LMSes and edtech platforms.
2. PowerPoint and Google Slides
Two of the classic slide-building apps, PowerPoint and Google Slides feel very traditional compared to many of the other tools listed here. Still, both apps are easy introductions to the concept of creating basic 2D designs and visually appealing presentations. PowerPoint Presentations and Google Slides allow students to create slideshow content with transitions, animations, multiple slide layouts, and more.
These presentation software solutions help students prioritize the information that’s most useful to their audience and hone the ability to present that material in a visually engaging way. They can also be used in conjunction with screencasting or screen sharing to present in a more live or interactive manner.
These apps are both widespread and integrate seamlessly with a variety of tools. For Apple users, Keynote is another option in this same style, but it’s limited to only macOS and iOS, making it less widely adopted.
Note that Google Slides is free for everyone with a Gmail account, but PowerPoint requires an individual subscription or a school-wide license.
3. Prezi Next
The original Prezi was like a cooler, snappier version of PowerPoint. It did away with the feeling that every slide was a static rectangular image and let users create presentations that felt more like unique little worlds 🌍 than like conference room snooze-fests 😴 .
Unfortunately, it was built on Adobe Flash, which is dead and gone .
Prezi Next is the new generation of Prezi, built fresh in HTML5. It keeps the feel of the original and enables students to produce creative, imaginative presentations full of both whimsy and functionality. Templates in Prezi Next allow students to be creative, detailed, and look great in the process.
Prezi also integrates with major video conferencing apps like Google Meet and Zoom, allowing students to present their Prezi live.
4. Haiku Deck
Haiku Deck is another slide-based presentation app. It’s entirely cloud-based, meaning you can access Haiku Deck from the web. The big differentiator with Haiku Deck is its automated image search. The app intelligently analyzes the text that your students add to their slides, then it suggests photos and slide designs that make sense for that text.
Haiku Deck gives users access to over 40 million royalty-free images (meaning no more watermarks or pixelated backgrounds) and includes dozens of themes designed by pros, complete with complementary fonts picked out for each one.
Haiku Deck is mostly a standalone tool. So, while you don’t get deep integrations with other tools, you might not really need them.
Related: Learn about the best tools for student engagement in this episode of EdTech Heroes !
5. Pear Deck
Before they ever explain what Pear Deck is, the team behind Pear Deck points to research showing that learning has both social, emotional and academic components and goes into great detail about the research-backed instructional strategies that the platform supports.
So, this tool comes from a team that’s dedicated to improving educational outcomes for all kinds of learners. But what does it do, exactly?
Essentially, Pear Deck operates as an add-on to Google Slides or PowerPoint and allows you to turn those static presentation tools into dynamic, interactive educational experiences. You can embed quizzes, tutorials, and other interactive content and see student responses in real time.
Although it’s aimed at teachers, it can be used by students to enhance their own presentations with engaging content like Q&A or audio and video, and gives them more creative freedom.
Sutori is a tool that’s purpose built to help students create timelines and roadmaps and tell stories. It’s simple and streamlined, making it easy for students of all ages to use. Students can even embed media on their Sutori timelines, and Sutori is easy to use online and via remote learning.
Sutori’s timeline focus makes it perfect for social studies or history and any other linear, time-based lessons. The company also lists use cases for English, Language, Arts, and STEM teachers. It’s a great tool for fostering multimedia collaboration, critical thinking (via both primary and secondary sources), and research skills.
They say a picture is worth a thousand words 📸, and if that’s true, how much more is an infographic worth? A lot, when it comes to the classroom. Infographics are great storytelling tools, not to mention visual aids. The trouble is that making great infographics from scratch have required graphic design skills🧑💻 — until tools like Easelly.
Easelly lets anyone make quality infographics in a wide range of styles. Students can better visualize data and content, which is great both for their own critical thinking and logic skills as well as their public presentation skills.
Easelly includes numerous templates that make it easy to transform content from dry text and statistics into beautiful infographics.
Easelly doesn’t directly integrate with other tools, but infographics created in Easelly can easily (hence the name) be exported to other tools to be shared or presented.
8. Glogster
Glogster is a tool for creating multimedia posters that can include 3D elements. Students can embed a wide range of media into a Glogster, including screencast videos, graphics, images, audio, and even 3D and VR objects.
Glogster is somewhat like an oversized poster board to make a class project or report, but also interactive and zoomable. It’s a digital canvas that makes just about anything visual possible, all within one space.
Students can practice their visual storytelling skills and get comfortable navigating and embedding multiple media types with Glogster.
9. VoiceThread
VoiceThread is a unique tool that lets users collaborate and discuss just about anything: videos, images, documents and more using features like annotations, highlights, pausing, zooming. It’s essentially a media-focused video chat tool.
In the K-12 landscape, VoiceThread is great for students who want to share a specific media file with others and collaborate either in discussion or in a Q&A after a presentation. Viewers can add video comments and questions directly to a presentation, giving a more personal level of engagement especially for fully remote classrooms. Students can develop great conversational and presentation skills using VoiceThread, too.
Miro is a visual collaboration tool designed primarily for teams to get work done. In other words, it’s a business-focused digital whiteboard tool that has a lot of value for classrooms too.
Students (and teachers) can use it for idea mapping 🗺, brainstorming, creating workflows or diagrams, and all sorts of other visual collaboration and presentation needs.
It’s great for group projects where students might want to get a bunch of ideas mapped out prior to creating their polished presentation in another tool. Miro also has some effective templates that can help students work quickly.
Because it’s a business tool, Miro has all kinds of integrations with all the top business apps. Some of these are useful in education, such as Zoom, Google drive, and Microsoft Teams integrations.
Find out why students and teachers love Screencastify 🍎
Screencastify is fantastic for any teacher who needs to create screencast videos quickly and easily. But it’s great for students, too!
Students can use Screencastify Submit to easily create video responses to their teachers’ assignments, using the desktop, laptop, or mobile device they have at home. Older students can even use Screencastify themselves to create their own screencast presentations for virtual reports, class presentations, and more.
Click to learn more about what Screencastify can do for educators and students alike.

Helping educators accomplish more, create visible success and inspire new ways of teaching.


IMAGES
VIDEO
COMMENTS
Discover five presentation ideas that you can use the next time you're presenting in class! Get high-quality infographic templates https://www.easel.ly/inf...
Ace your presentations at work or school and facilitate a well-rounded discussion with your bosses, colleagues, or students by editing video presentations from Canva that serve your wide-ranging topics. Customize one from our collection of free templates or start from scratch.
The best class presentations combine strong content and visuals with an engaging presentation style. This post offers 11 steps for creating memorable and high-performing class presentations.
FlexClip's free education video maker helps you break down complex educational topics into engaging videos with joyful music in minutes. Whether you need a video for academic discussion, curriculum or how-to explanation, you can effortlessly make a great one by adding videos, images, texts and more.
Get 17 free presentation templates for teachers and discover creative ideas for class presentations that will engage your students like never before!
Students have access to all sorts of digital presentation tools, from legacy slide-based tools like PowerPoint to truly inventive and experimental new formats that incorporate live and prerecorded video and audio.